Welcome to my iphone development code blog

Welcome to my iphone development code blog
"SIMPLICITY IS BEST PROFESSION"

Thursday, May 13, 2010

iPhone Programming Tutorial – Populating UITableView With An NSArray


The goal of this tutorial is to show you how to populate a UITableView with data from an array of objects. This will be the building block to display XML data as well as SQL data.

The theme of this application will be fruit. We will create an array of “fruit” objects that have some additional information besides the name. We will populate a UITableView with the names of the fruits. When the user selects a fruit from the list, the view will transition to another one and display specific details about that fruit.

I will try to be as detailed as possible however it would be useful if you have completed the following tutorials as I will use concepts from each of them:


Open up X-Code and Select File->New Project… Select Navigation-Based Application and click Choose…


Name your project Fruit.
We are going to create our “fruit” objects that will be used in the application. If you are not too familiar with object oriented programming…Google it. That tutorial would be a little too huge for me to write.

Click on File -> New File… The object we are creating will inherit from NSObject, so select NSObject Subclass and click Next.


The next screen will ask you to name it. Go ahead and name it “Fruit” and make sure that “Also create Fruit.h” is checked. It should look like the screen below. Then, click Finish.


Now, we are going to define the properties of a “Fruit” object. For this application a fruit will have a name and a description. Open Fruit.h and add the following code:


We have created the properties needed to represent our fruit. There is one line that you may be unfamiliar with. The line -(id)initWithName:(NSString*)n description:(NSString *)desc; is a definition for a function. This function will be called to initialize a Fruit object. All NSObjects have an init method, but we want to create our own so that we can pass in a name and description when the object is created.

Open up Fruit.m and add the following code:


Here we implement the initWithName method. The code here seems pretty straight forward. We are basically setting our local copies of name and description to the arguments passed to this method. The important thing to notice here is the return self line. This is crucial for using this method as a constructor. It allows this function to return the newly created instance of a fruit object.

Next, we are going to set the title of our main view. This is necessary to create a back button when transitioning between views. Open up RootViewController.m…In the viewDidLoad method, add the following code:


We are setting the title property of the RootViewController object to the string “Fruits”. Also, be sure to add the #import “Fruit.h” line at the top to include the fruit object in our project as well as @synthesize fruitView to add the “getter” and “setter” methods.

Next, we are going to create an array of fruit objects. Open up FruitAppDelegate.h and add the following code:


All we are really adding here is an NSMutableArray property. I used NSMutableArray instead of NSArray because it has a few more methods making it more flexible.

Now, open up FruitAppDelegate.m and add @synthesize fruits to the top. This is so other objects will have access to the fruits array. Also, be sure to include the import statement for Fruit.h.
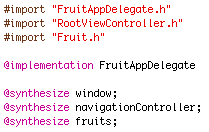


Now add the following code to the applicationDidFinishLaunching method.


What we are doing here in the 1st three lines is creating new instances of a fruit object. Notice that instead of calling init, we are calling the initWithName method that we created. This is allowing us to pass in a name and a description to each of the fruits.

The next line [self.fruits = [[NSMutableArray alloc] initWithObjects:apple,orange,watermelon,nil]; builds a new array from the objects we just created. It is important to pass in nil as the last argument in an NSMutableArray. It will not work unless you remember this.

Now we are going to create the view that will be displayed when the user selects a fruit. Double click on any one of your .xib files to open up Interface Builder.


Click File -> New and select view and click choose
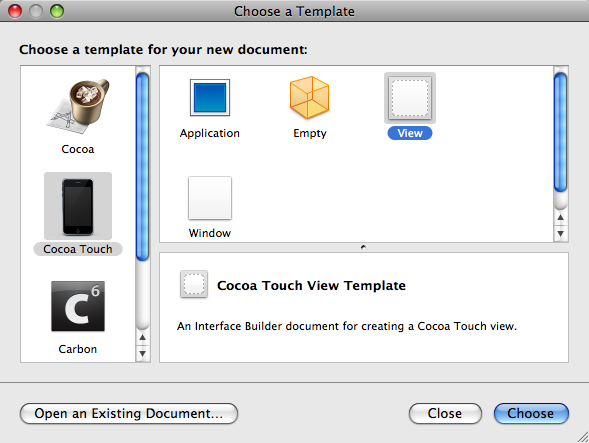


You should now see the new view (it will be blank) and the objects associated with it. We need some sort of text field to display the description of the fruit. For this tutorial I have chosen a UITextView as opposed to a UITextField. This is because a UITextView is multi-line and is great for displaying more than one line of text. So, go ahead and drag it on to your view. Your view window should now look like this:


Now click File -> Save. One important thing to keep in mind is to make sure you are saving it in the current project’s directory. It seems that every time I add a view to a project, the default directory is not my project’s directory. Name this file FruitViewController and click Save.
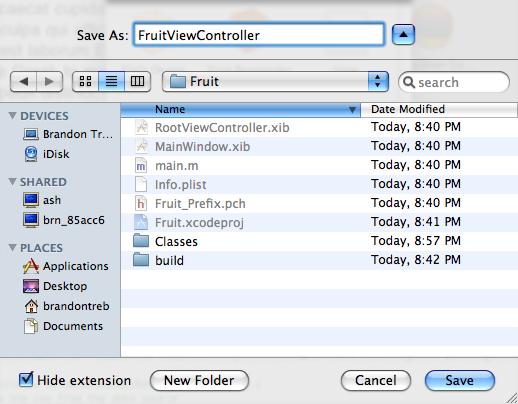


Another window should show up after you click save. It is asking you if you want to add this view to your project. Just check the box net to Fruit ,click Add, and close Interface Builder.


Close Interface Builder and go back to X-Code.

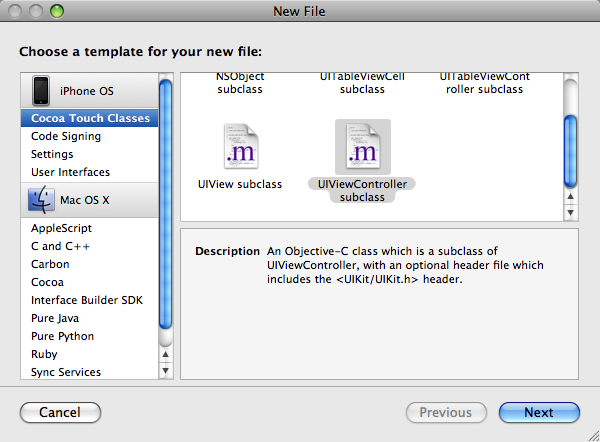
We need to create a ViewController to handle our View. Click File -> New File… Select UIViewController subclass and click Next.


Name this file FruitViewController.m and check the box that says “Also create “FruitViewController.h” . Click Finish.


Now we will declare an Interface Builder Outlet for the UITextView that we added to the view. Open up FruitViewController.h and add the following code.


This line allows us to associate the fruitDescription property with the UITextView we created. Open up FruitViewController.m and add this code underneath @implementation keyword. This creates default “getter” and “setter” methods for the fruitDescription property.


Double click on FruitViewController.xib to open it in interface builder. We need to connect the view to the FruitViewController class we just created. Click on the File’s Owner object.


Click Tools -> Identity Inspector. Select FruitViewController from the dropdown next to class. Notice that under the Class Outlets section you will see the UITextView property we created.


The last step in interface builder is to connect the UITextView. Click Tools -> Connection Inspector. You should see an Outlet that says fruitDescription. Click in the corresponding circle and drag it over the UITextView on your view and release it.

Now, click the circle next the word View under outlets and drag it to the View object inside of the window that says FruitViewController in the title. When you are done the screen should look like this:


Now close Interface Builder.

The first thing we are going to do here is create a property for our new view so that it can be transitioned to when a fruit gets clicked on. Open RootViewController.h and add the following code:


We are just creating a property for the fruitViewController that we added to the project. Also note that I added the #import “FruitViewController.h” line. this will allow us to create new instances of the FruitViewController object.

Now open the RootViewController.m and find the numberOfRowsInSection method. This method tells the UITableView how many rows it will be displaying. In our case it will be the size of the array of fruits. Add the following code (click the image to enlarge):


The first line allows us to gain access to the appDelegate of our application. This is where we defined the fruit array. Once we have access to the delegate the count property of the fruit gets returned.

Now find the cellForRowAtIndexPath method and add the following code:


So the first line we added is the “FruitAppDelegate *appDelegate…” line. Again, this is giving us access to the appDelegate object where we declared the fruit array. The next line calls the objectAtIndex method on the Array of fruits. The index we will be using can be accessed via indexPath.row. This is an integer value representing each row of the UITableView. Finally, we call the setText method of the cell, to display the name of the fruit in each cell at the given index.


This is the last step. We are going to detect which row in the UITableView the user selected. Find the method called didSelectRow and add the following code(click image to enlarge).


This method gets called every time a user taps on a cell in the UITableView. The parameter indexPath has a property called row that is the integer value of the cell the user clicked on. To access this, we call indexPath.row.

The first line again gives us access to the appDelegate. The next line indexes into the fruits array and makes a copy of the selected fruit object.

The next section starting with “if(self.fruitView == nil)”, initializes the viewController if it hasn’t already been initialized (see my previous tutorial if you need more of an explanation on this). One thing to take note of: Make sure that the parameter you pass to initWithNibName matches the name of the .xib file you used for your view. So in our case, its FruitViewController.

Following this line is the line that pushes the viewController on to the navigationController stack. This causes the view to transition to the new view.

The last 2 lines pass the fruit information to the new view. They are fairly self explanitory. We first set the title of the view to the name of the fruit and then set the description text to the description of the fruit.

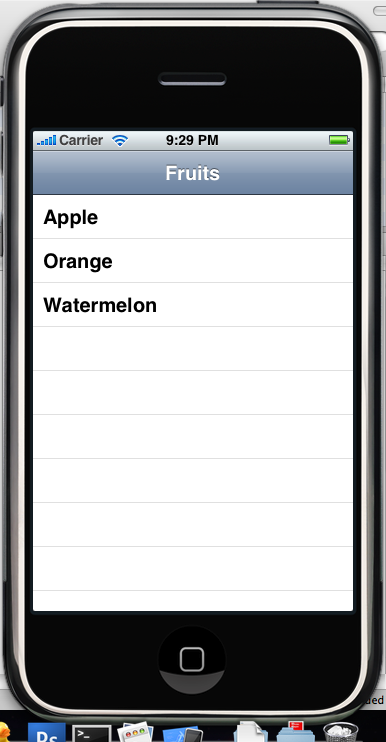
Now click Build and Go and your app should launch. Here are some screenshots of how it should look.


And after clicking on a fruit…


Well, I hope that you got a lot out of this tutorial. As always, if you have any questions or comments, feel free to leave them in the comments section of this post. We also have a forum to help you will all of you iphone related questions. If you get lost, you can download the sample code here


Happy iCoding!

iPhone Programming Tutorial – Transitioning Between Views

This tutorial will focus on transitioning from one view to another. We will be utilizing Apple’s UINavigationController. I will be using the code from the “Hello World” tutorial that I previously wrote. So if you have not completed it yet, go ahead and do it and come back to this page. (It’s quick I promise). You can view it here.


The first thing we are going to do is change our “Hello World” text to say something that sounds more like navigation. Go ahead and open RootViewController.m. Location the cellForRowAtIndexPath method (it’s the one that you edited to display “Hello World” in the table cell.

Change the line: [cell setText:@"Hello World"] ; to [cell setText:@"Next View"];


Add A New View
We will now add the view that we will be transitioning to. Click on RootViewController.xib and this should open up Interface Builder. We don’t actually need to edit this file. Once inside Interface Builder click on File -> New and select View.


It will add a blank View to your project. For now, we will keep it simple. Go ahead and drag a new Label on to the View. Double click on the label and change the text to whatever you want. I set mine to View 2 (I know, not very imaginative).


Let’s save the view. Click File -> Save. Call it View2. Make sure that you save it inside your Hello World project’s directory. It may want to save it somewhere else by default.


Next, you will see a screen asking you if you want to add the View to your project. Check the box next to Hello World and click Add.


Close Interface Builder. Drag the View2.xib file into the Resources folder, if it didn’t appear there by default (this will help maintain organization).

Add A View Controller
Now we need to create a ViewController class. This class will be used to connect the view that we just created to our code. Inside of Xcode click File -> New File… Select UIViewController subclass and click Next.


Name it View2ViewController and make sure “Also create “View2ViewController.h” “ is checked. Click Finish to continue. This will add the new ViewController to your project.


For organization sake, drag your View2ViewController.h and .m files into the Classes folder if they didn’t appear there to begin with.

Set Up The Transition To The New View
Open up RootViewController.h and add the following code:


This code should be pretty self explanatory, but I will explain it anyway. The import statement #import “View2ViewController.h” gets the header file of the ViewController that we created and allows us to create new instances of it.

Next, we declare a variable called view2ViewController which is of the type View2ViewController. One thing that I want to point out is the first part starts with a capitol “V” which is the type of object that we are declaring. The second part starts with a lower case “v“. This is our variable name that we will use to reference our ViewController object. Finally, we make our variable a property to set additional information.

Now, open up RootViewController.m and add the following code underneath @implementation RootViewController. This creates default “getter” and “setter” methods for our view2ViewController property.


Next find the function didSelectRowAtIndexPath. It may be commented out. If it is, go ahead and uncomment it. This method gets called (automatically) every time a table cell gets tapped. Notice that it takes an indexPath. This will be useful later on when I show you how to populate a UITableView with an NSArray. We will ignore it for now.

Add the following code to the method.


First we check to see if self.view2ViewController is null. This will happen the first time the user presses on the table cell. After this, the viewController gets stored in memory to optimize performance. Next we create a new instance of a View2ViewController and set it to our view2ViewController. Remember to pay attention to a capitol “V” verses a lowercase “v”. After we set this viewController to our viewController, it should be released. Remember, objective-c does not have a garbage collector, so we need to clear all of our unused objects from memory.

Finally, the last line of code is what actually transitions our view to the newly created view. The navigationController object is a stack that contains viewControllers. The view at the top of the stack is the one that gets rendered. So all we are doing is pushing a viewController onto this stack. There last part animated:YES, tells the compiler that we want an animated transition to the next view.

Connect The View To Code
Before this code will execute, we must connect the code that we just wrote to the view we just created. Double click on View2.xib to open it up in Interface Builder. We need to associate our View2ViewController class object with the view so click on the File’s Owner object and then click Tools -> Identity Inspector.


Click the dropdown next to class and select View2ViewController.


Next click anywhere on your view to select it. Click Tools -> Connections Inspector. Click in the circle next to New Referencing Outlet, drag it to the File’s Owner object and release it. The word view will popup. Go ahead and click on it.


Close Interface Builder. You can now click Build and Go. When you click on the words “Next View”, you will see the screen transition to your new view. There is still one thing missing. There is no back button in the NavigationController at the top. Apple actually adds this for us, but we need to set a title on our main view.

Adding The Back Button
Close the iPhone Simulator and open RootViewController.m. In the viewDidLoad method (gets called when the view is first loaded) add the following code.


Since RootViewController extends Apple’s class UITableViewController, it comes with a title property. You can set this to anything you want. I have set it to the string “Hello”. Now click Build and Go and you are done. Here are a few screenshots.


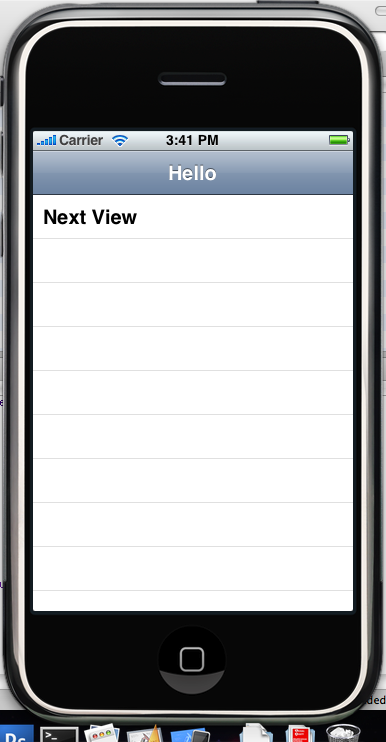
When you click on “Next View” it should transition to:


Notice the back button at the top with the text “Hello”. If you press it, your view will be popped from the NavigationController stack and the previous view will be shown. If you have any problems/questions/comments post them in the comments. I’m pretty good about answering them as it emails me when you do so and I receive them on my iPhone. If you have any problems, you can download the source code here Hello World Views Source. Happy iCoding!

iPhone Programming Tutorial – Connecting Code to An Interface Builder View

Finally, we get to write some real code! In this tutorial, I will show you how to create an interface using Interface Builder and connect it to your code. We will be creating a UITextField, UILabel, and a Button. Now, don’t be intimidated that this tutorial is so long. I have really went into detail explaining everything as I go. You could easily scan over it and get the gist of it. Here’s how the application will work:

The user will tap inside a text box which brings up the iPhone’s keyboard
The user will type their name using the keyboard
The user will press a button
The label will update with a greeting containing that user’s name (ex. “Hello Brandon!”)
If the user fails to enter in text, the label will say something like “Please Enter Your Name”
Prerequisites: This tutorial assumes that you have completed the following tutorials

Hello World Tutorial Using UITableView


Beginner Interface Builder

Like the last tutorial I wrote, we are going to need only one view. So we will just use Apple’s View-Based Application template. So click File -> New Project. Select View-Based Application and name it ViewBased (You can name it whatever you want).


So like last time, Apple has provided us with most of the code needed to get this app up and running. You can click Build and Go to launch the simulator, but all you will see is blankness.

Let’s get started by double clicking on ViewBasedViewController.xib. This is a nib file that opens with Interface Builder. It contains information regarding the layout and controls of our view. Once you do this, Interface Builder should open up.

It will look something like the screenshot below.


A few notes about interface builder…

Library – The right-most window contains all of your controls that you can add to your view. For this tutorial we will be using a TextField, Label, and Button.

The next window to the left of that contains objects that we will connect our interface to. View represents the view of this nib file (basically the interface). File’s Owner is the object that links the interface to the code.

View - This is your user interface for your iPhone application. This window is where you will drop controls from the right-most window.

Attributes – This is where we will set the styling properties of our controls

Add a Text Field
The first thing you want to do is drag a Text Field from the library box on to your view window. You will see some blue lines to guide you. These are in place to help line up controls as well as center them.

Once you have added the Text Field to the View, move it around until it’s in a position that you are happy with. Next, stretch each side of the text box so that it spans accross almost the entire view area. (The blue lines on the right and left will let you know when to stop.)

Now we are going to set some of the attributes of the Text Field. If the Attributes Inspector doesn’t appear, click on the Text Field and then click Tools -> Attributes Inspector.

In the Placeholder field type in Name. This is the default text that appears in the Text Field before a user types anything.
For Capitalize select Words – This tells XCode that we want to capitalize each word
For Return Key – Select Done. This makes the return key on the keyboard say Done rather than return.
Also, make sure Clear When Edit Begins is checked


Add a Label
Drag a Label from the Library onto your view. Similarly, stretch it the length of your view and place it where you would like. Let’s change the default text of the label. If the Attributes Inspector doesn’t appear, click on the Label and then click Tools -> Attributes Inspector. In the Text field type in “Enter your name above” (or below depending on where you chose to put the label in relation to the Text Field.


Add a Button
Now drag a Button from the library onto your view. Stretch it and position it however you would like. Now we need to add some text to the Button. Click on the button and then click Tools -> Attributes Inspector. In the Title field, type “Display“.


We are now done creating our interface. It should look something like this:


The files that link an interface to some code are called View Controllers. Let’s open up ViewBasedViewController.h. This is the file where we will declare all of our interface variables. Add the following code to you ViewBasedViewController.h.


Interface Builder uses IBOutlets and IBActions to connect to the code. Here is a brief explanation of each line of code.

IBOutlet UITextField *textName – creates an outlet to connect to the text field we created in interface builder. We use this variable to get information from the text field.
IBOutlet UILabel *lblHello – An outlet that connects our label on our interface to the code. This variable is used to set the value of the label.
Now that we have declared these variables, we need to make them properties. This allows us to set certain attributes that are associated with the variables. Retain tells the compiler that we will handle the memory management of this object (don’t forget to release it when you are done). Otherwise it will get “cleaned” after being instantiated.

There is one other thing here.

- (IBAction) updateText:(id) sender;

This is the function that will get called when the user presses the button that was created in Interface Builder. We are simply declaring it here in the header file. We will implement this function a little later in the tutorial. Now, we need to connect the interface to the code. Double click on ViewBasedViewController.xib again to open up Interface Builder.

Connect the View
Click anywhere on the background of your view (anywhere that is not the Text Field, Label, or Button). Now click Tools -> Connections Inspector. Next to New Referencing Outlet, you will see a circle. Click in that circle and drag the blue line to the File’s Owner object and release it. The word view should pop up. Click on it. You have now connected the view to your proxy object. You should now see:


Connect the Text Field
Click on the Text Field in your View window to select it. Then click Tools -> Connections Inspector. You will now see a circle next to New Referencing Outlet. Click in that circle and drag it over to the File’s Owner object. A message will pop up with txtName. Click on txtName and the connection is made. You should now see:


Connect the Label
Click on the Label in your View window to select it. Then click Tools -> Connections Inspector. You will now see a circle next to New Referencing Outlet. Click in that circle and drag it over to the File’s Owner object. A message will pop up with lblHello. Click on lblHello and the connection is made. You should now see:


Connect the Button
Click on the Button in your View window to select it. Then click Tools -> Connections Inspector. You will now see a circle next to Touch Up Inside. This is the trigger that gets called when a user presses the button. Click in that circle and drag it over to the File’s Owner object. A message will pop up with updateText. Click on updateText and the connection is made. You should now see:


Now all of the connections should be set up. Go ahead and close Interface Builder. We are done using it.

Open up the file ViewBasedViewController.m . This is the file where we will implement the updateText function. Add the following code…


This code is pretty straight forward and easy to follow. I will explain it line-by-line:

@synthesize txtName,lblHello;

Most of the time when creating (private) variables, you need to specify what are called “getter” and “setter” methods. Theses functions get the value of a variable and set the value of a variable. What synthesize does is creates these methods for you under the hood. Pretty handy…

Next we will implement our updateText method. I started by creating a temporary string. This is the string that we will insert into the text of the label.

The next line checks to see if the user has entered any text int the Text Field. txtName.text returns an NSString. We are simply calling the length method on a string. If the length is 0, then obviously the user has not entered any text. If this is the case, we set the temporary string to “Please enter your name”: instructing the user to enter in their name.

If the user has entered in some text, a new string is allocated. The initWithFormat method is similar to printf in C. So, I used the string “Hello %@!”. The “%@” in the string means we will be substituting it for a string. To get the value of the Text Field we again use the txtName.text property.

Finally, the value of the Label is set by calling lblHello.text. This calls the text property of label and sets the text to our temporary string variable.

The last line ; releases the temporary text field from memory. This is necessary to write an efficient iPhone application. If you want to know why a lot of iPhone apps crash, it’s because the developers don’t follow through with this step.

That’s it! Click Build and Go. The application should launch in the iPhone Simulator. When you click inside the Text Field it should bring up the iPhone’s keyboard (you can also type with your keyboard). Enter in your name and click “Display”. Here are a few screens of what your app should look like.


Well, that concludes this tutorial. I hope that I was able to help you out on your road to iPhone glory. If you get lost at any point you can download the code to this tutorial here ViewBasedSampleCode. As always, if you have any questions or comments, be sure to leave them in the comments section of this page. Happy iCoding!